[
      {
        "name": "500x250 Ad",
        "insertPoint": "5",
        "component": "15667920",
        "parentWrapperClass": "",
        "requiredCountToDisplay": "1"
      }
    ]
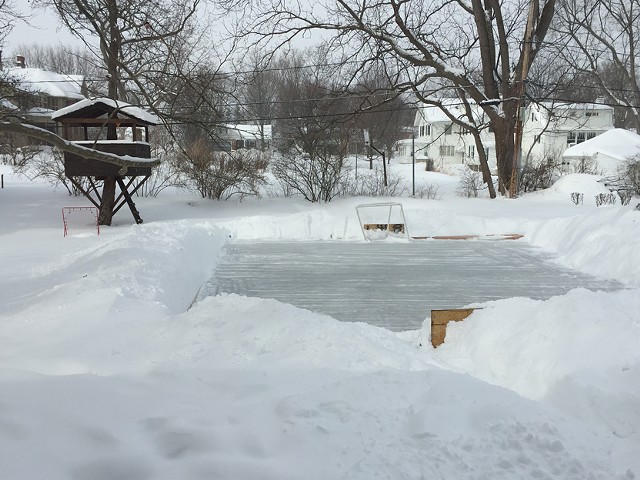
There’s more than one way to build a backyard rink. But this four-step process is the simplest and easiest on the wallet.
Whatever you do, steer clear of the elaborate rink-building kits that retail for anywhere from $800 to $2,500. They’re unnecessary.
Wayne Gretzky’s father, Walter Gretzky, who engineered the most consequential backyard rink ever built, got by with a sprinkler and a snow shovel. Mother Nature has intervened since “Wally Coliseum” was in its heyday, so you’ll need more tools. But not much more.
There are four essential ingredients: wooden boards, wooden stakes, a big plastic sheet, and water. What you’re doing is basically building a tub in your yard and filling it up. When it thaws, it’ll be a giant birdbath.
For a simple, small rink of, say, 20-by-40-feet, you’re looking at spending no more than $400 your first time. After that, you’ll shell out much less because you can reuse most, if not all, of your materials.
Not to rain on your rink before you get started, but don’t even try building one unless your yard is relatively flat. If you’re like me, you’ll eyeball your yard, tilt your head this way and that, and say, “Looks flat to me,” and then open the spigot.
But few yards are truly flat, and you won’t really know how sloped yours is until you start flooding it. Gravity will let you know. Hold a glass half full of water and tilt it from side to side. The water stays level in the glass, and it will do the same inside the basin of your rink.
STEP 1 – Framing your rink: Fashion your boards in the shape of a square or rectangle, then hammer the stakes into the ground on the outside of them. They’ll act as the braces for the boards. I like to screw the stakes into the boards for extra support. But it’s not entirely necessary. When the water starts filling the basin, the pressure of it will push the boards against the stakes.
STEP 2 – Building the tub: Carefully drape the plastic sheet over the frame. Be sure that it extends over the edges, then gingerly “tuck it in” to line the ground and the boards. Whatever you do, don’t step on the sheet. One tiny imperceptible tear and you’ll have a slow leak that’ll slowly drive you crazy. Sometimes, this process is beset by wind that catches the plastic like a parachute. You can avoid that by clamping the sheet to the boards or by using something heavy, like a brick, to act as a paperweight on the excess plastic draping over the boards.
PRO TIP: If you have a long enough cold snap, and you have the patience, consider dousing the ground with water before laying the plastic. The ground will freeze and the thin layer of ice will provide a colder foundation for your rink.
STEP 3 – Fill the tub: This step is self-explanatory. Get a garden hose, turn on the spigot, and let the water flow. All you really need to skate is for a couple of inches of water to freeze solid. But if your backyard is sloped, one end of your tub will be deeper than the other. The best time to fill the tub is during a three- to four-day cold snap. But if your ground is level you might get by with two days.
STEP 4 – Lace up the blades: And skate for the Stanley Cup . . . or just do whatever! David Andreatta is CITY's editor. He can be reached at [email protected].
Whatever you do, steer clear of the elaborate rink-building kits that retail for anywhere from $800 to $2,500. They’re unnecessary.
Wayne Gretzky’s father, Walter Gretzky, who engineered the most consequential backyard rink ever built, got by with a sprinkler and a snow shovel. Mother Nature has intervened since “Wally Coliseum” was in its heyday, so you’ll need more tools. But not much more.
There are four essential ingredients: wooden boards, wooden stakes, a big plastic sheet, and water. What you’re doing is basically building a tub in your yard and filling it up. When it thaws, it’ll be a giant birdbath.
For a simple, small rink of, say, 20-by-40-feet, you’re looking at spending no more than $400 your first time. After that, you’ll shell out much less because you can reuse most, if not all, of your materials.
Not to rain on your rink before you get started, but don’t even try building one unless your yard is relatively flat. If you’re like me, you’ll eyeball your yard, tilt your head this way and that, and say, “Looks flat to me,” and then open the spigot.
But few yards are truly flat, and you won’t really know how sloped yours is until you start flooding it. Gravity will let you know. Hold a glass half full of water and tilt it from side to side. The water stays level in the glass, and it will do the same inside the basin of your rink.
STEP 1 – Framing your rink: Fashion your boards in the shape of a square or rectangle, then hammer the stakes into the ground on the outside of them. They’ll act as the braces for the boards. I like to screw the stakes into the boards for extra support. But it’s not entirely necessary. When the water starts filling the basin, the pressure of it will push the boards against the stakes.
STEP 2 – Building the tub: Carefully drape the plastic sheet over the frame. Be sure that it extends over the edges, then gingerly “tuck it in” to line the ground and the boards. Whatever you do, don’t step on the sheet. One tiny imperceptible tear and you’ll have a slow leak that’ll slowly drive you crazy. Sometimes, this process is beset by wind that catches the plastic like a parachute. You can avoid that by clamping the sheet to the boards or by using something heavy, like a brick, to act as a paperweight on the excess plastic draping over the boards.

PRO TIP: If you have a long enough cold snap, and you have the patience, consider dousing the ground with water before laying the plastic. The ground will freeze and the thin layer of ice will provide a colder foundation for your rink.

STEP 3 – Fill the tub: This step is self-explanatory. Get a garden hose, turn on the spigot, and let the water flow. All you really need to skate is for a couple of inches of water to freeze solid. But if your backyard is sloped, one end of your tub will be deeper than the other. The best time to fill the tub is during a three- to four-day cold snap. But if your ground is level you might get by with two days.
STEP 4 – Lace up the blades: And skate for the Stanley Cup . . . or just do whatever! David Andreatta is CITY's editor. He can be reached at [email protected].


Latest in News
-

Meet CITY's new arts writer: Patrick Hosken
Apr 1, 2024 -

Rochester misses the boat on fast-growing Great Lakes cruises
May 8, 2023 -

Monroe County seed libraries take root
Apr 21, 2023 - More »
More by David Andreatta


Celebrate Spring! Homeschool Family Field Trip Day @ Genesee Country Village & Museum
Calling all homeschool families! Participate in a guided program, led by our...

How to Practice Mindful Gratitude with Mindful Matters @ Irondequoit Public Library
Mindful gratitude is a practice that involves cultivating a conscious and appreciative...